
Managing Pages in the Sites Panel
Working with Rows, Columns, and Adding Elements in the Site Builder
When you open a page in the Site Builder, you control the layout using rows, columns, and the blue “+” buttons, which let you insert new elements anywhere on the page.
1. Rows
-
Each grey section represents a row.
-
You can add a new row by clicking the blue “+” button that appears between rows.
-
Rows help you organise content into clear horizontal sections.
2. Columns inside a Row
-
Each row can contain 1 to 12 columns, based on the grid layout system.
-
Most rows are set to 1 column at 12/12 width (full width).
-
You can change the width of a column using the “Column (Size: 12/12)” control at the top of the column.
-
You can also split a row into multiple columns (e.g., 6/12 + 6/12, or 4/12 + 4/12 + 4/12).
3. Blue “+” Buttons
These buttons allow you to add new elements to the page:
-
Top + button → adds an element at the top of the row.
-
Inside-colour + button → adds an element inside a specific column.
-
Between rows + button → adds a completely new row with an element.
When clicked, the Add Element panel opens, where you can select:
-
Text
-
Images
-
Documents
-
Files
-
Galleries
-
Forms
-
Policies
-
and many other available modules.
4. Example Based on Your Screenshot
-
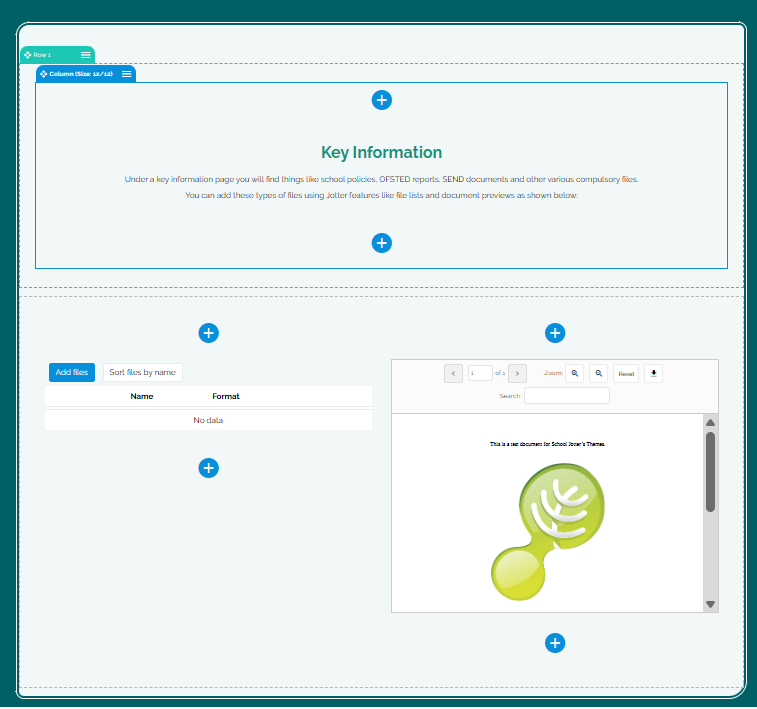
The top section contains the “Key Information” heading and the text below it — all inside a single 12/12 column.
-
The next section is a row split into two columns:
-
Left column: a file list with an Add Files button.
-
Right column: a document preview.
-
-
Each column has its own blue “+” button, allowing you to add elements only to that specific area.